
One of the biggest muscle groups on the front of your body is the chest. Chest muscles are commonly referred to as the “beach muscles” because they’re the ones that people usually target while they’re exercising for looks. Did you know you can strengthen and build up your chest muscles without going to a gym? Sneaky Health will show you the correct ways to use chest calisthenics workouts to build chest muscles just as effectively as using free weights or weight machines.
This article will review basic and advanced calisthenics exercises to build chest size and strength. You may be familiar with some of the exercises in this article and unfamiliar with others. In any case, I think the best way to approach calisthenics for chest workouts is with an open mind. I will focus on the proper techniques to get the most out of each chest calisthenics workout. These exercises were chosen to help you get stronger, more stable, more mobile, and more coordinated.
Basic Chest Calisthenics Workouts
Here are some basic chest calisthenic workouts that you are already familiar with. However, you must read and watch the videos to ensure that you do the exercises the right way to get the most out of each movement.
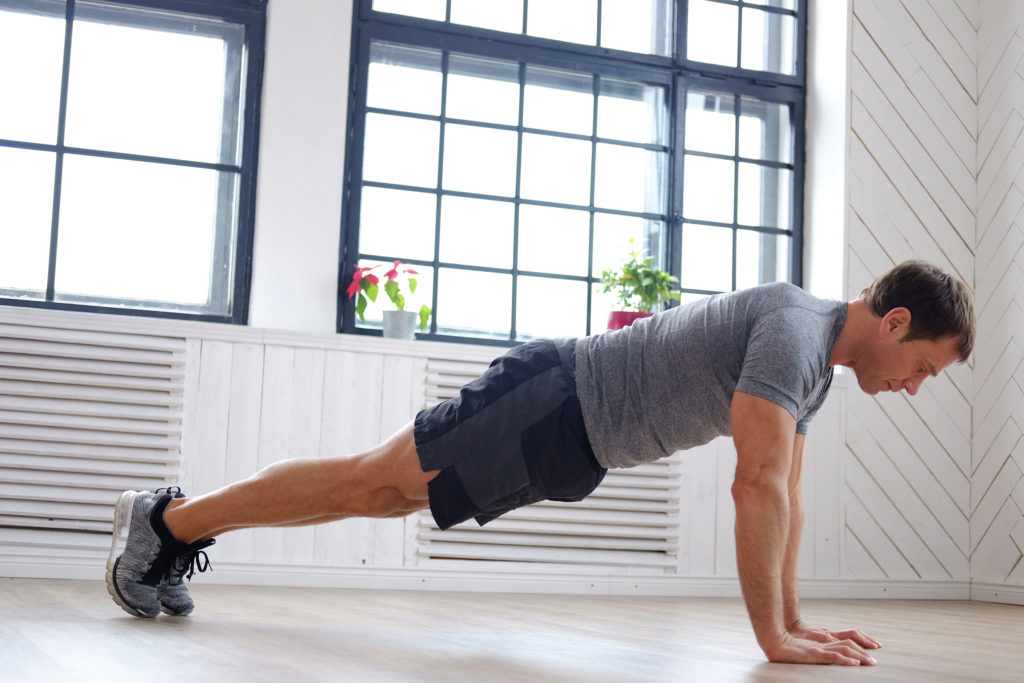
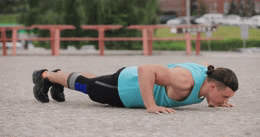
Push-ups
Here is a step-by-step guide on how to do push-ups correctly: When you do push-ups, how you do them is very important. Each push-up must be done perfectly so that the total number of reps you do from one workout to the next is the same. For instance, if you did thirty perfect push-ups two days ago and then did sixty push-ups today by only going down halfway or sticking your behind up in the air, etc., it’s impossible to tell if you got stronger or not.
Correct set-up to do a straight push up:
- Set your hands at a spacing somewhat wider than shoulder-width apart when you’re on the ground. Angle your hands in a way that feels natural to you, depending on your skill level. Your hands should be held so that your middle fingers point straight up and away from you. Of course, if it’s easier on your wrists, rotate your hands slightly inwards, or perform your push-ups on your knuckles (if you’re on a soft surface like grass or carpet).
- Arrange your feet in any way that feels natural and comfortable to you. Some people want their feet to be shoulder-width apart, while others prefer their feet to be touching. The wider your feet are apart, the more stable you will be throughout your push-ups and the easier they will be to complete.
- Consider your entire body as one giant straight line, from your head to your heels. In other words, your butt should not be droopy or pointing straight up in the air.
- If you’re having trouble getting proper body form, try clamping your butt together and then tightening your abs. Your core should be active, and your body should be in a straight line. However, if you haven’t been doing push-ups properly, this could be a significant change.
- Instead of staring straight down, your head should be somewhat ahead of you. Your chin, not your nose, should be the first part of your head to hit the floor if you’re performing them correctly. You can maintain your body in line by looking up, but you can also gaze down if it helps you concentrate better.
- Your arms should be straight and support the weight at the top of your push-up. Now you are ready to perform a push-up.
Variation:
Move hands closer together: Someone who performs a regular push-up with his hands close together does not have bad form. In fact, he’s doing a classic push-up variation that focuses on the triceps muscles. You can also target the triceps by adjusting your form during an incline push-up. Moving your hands closer together than shoulder-width is all that’s required. The practice is otherwise carried out in the same manner.
Correct set-up to do an incline push up:
Usually, the floor is the ideal place to start when practicing your push-ups. However, using a raised support, such as a park bench, a solid railing, or a sofa, is required when doing incline push-ups. This allows you to put your body in the correct position to perform a safe and strong push-up motion. To get the most out of your chest calisthenics workouts, here are the proper techniques to follow for incline push-ups.
- Begin by positioning your hands shoulder-width apart or slightly wider on your support (the bench or railing). Step back until your body is in a straight line from head to toe, and your arms are straight out in front of you.
- While keeping your body straight, lower your torso toward your hands. Finish by placing your hands at the base of your lower chest. Push yourself up from the bottom until your arms are straight.
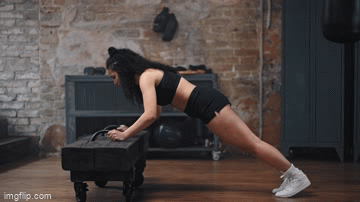
Incline Push-Up Target Muscles:
Muscles
The sternal head of your pectoralis major, which makes up the bulk of each side of your chest, is the target muscle during an incline push-up. Although this muscle is the sole goal of an incline push-up, the exercise also involves several other muscles. Your triceps, deltoids, and the clavicular head of the pectoralis are major muscles that assist you in completing the motion. Also, several muscles in your legs and core contract but do not move much.

VARIATIONS:
Change your incline: Change the angle of your body to modify the resistance of the incline push-up. Your arms will face more resistance the closer your hands are to the floor. In other words, the higher the support is from the floor, the easier the push-up will be.
Advanced Chest Calisthenics Workouts
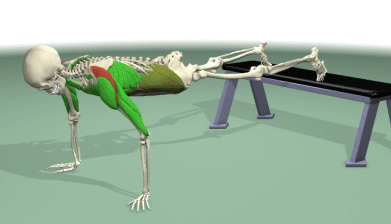
Decline Push-Ups:
A decline push-up is an advanced form of the standard push-up in which you place your feet higher than your hands, considerably increasing the level of difficulty. Add this exercise to your upper body strength training routine when you’re ready for a more significant challenge.
- Muscles worked: Chest, arms, shoulders, and core.
- Bench or steps are required.
- Advanced level
The Proper way to Do a Decline Push-Up
- You need to put your feet on a bench, step, or something else stable for this exercise. The slope can be as little as an inch or a couple of feet high. By changing the height of the bench, you can change how hard your workout is.
NOTE: If you lift your feet too high, you could hurt your form, so be careful if you raise them above your waist.
- Start on your hands and knees with your hands about shoulder-width apart or a little further apart. Be careful not to put them too far apart, or you will have less room to move as you go down.
- Move each foot into place by stretching out your body and propping it up on the bench or step. Your body should be in a straight line from your shoulders to your toes. Your hips shouldn’t sag or arch. Move your hands and make sure your elbows are out if you need to
- By bending your elbows, you can lower your chest almost to the floor. Stop when your elbows reach your ribcage. Keep your body straight and move in a smooth, controlled way.
- As you get closer to the ground, look up a little bit so that you can move freely and don’t hit your nose or forehead on the floor. You might want to arch your back if you’re in this position but don’t. Doing so isn’t helpful and could cause you to get hurt.
- To get back to where you started, push up until your elbows are straight but not locked.
Target Muscles and Benefits of Decline Push-Ups
The decline push-up is an advanced upper-body exercise that works the chest, shoulders, back and arms. Also, keeping your body in the correct position takes strength and stability in your core, legs, and back.
Research shows that doing decline push-ups may help athletes improve their performance in some sports. For example, volleyball players who did this exercise as part of their training routine could serve more accurately in one study.
When you do push-ups, you improve your functional fitness, which helps you when you push things in everyday life. Since they work the muscles that keep your shoulders stable, they may even help you avoid rotator cuff injuries.
Chest Calisthenics Workouts Safety Tips:
People often blame push-ups for shoulder, wrist, and elbow pain. This kind of pain comes from hunching your shoulders at the bottom of each rep most of the time. Keep your shoulders down and away from your ears to avoid slouching and the joint stress that comes with it.
If you have hurt your shoulder, wrist, or elbow, you shouldn’t do push-ups. Talk to your doctor or physical therapist to find out if this is a good exercise for you or to get suggestions for other activities that might be safer but still help you reach the same goals.
If you want to protect your wrists, you can keep them in a neutral position by putting your hands on dumbbells or push-up bars. Stop doing push-ups if your shoulder hurts or makes a clicking sound while doing them.
Repeat this exercise as many times as you can without ruining your form, up to three or four sets of eight to fifteen reps.
Conclusion:
Please keep a few things in mind as you practice and perfect these chest calisthenics workouts. First, exercise and physical training are meant to make you feel good and improve your quality of life. If you ever feel like your health or life is getting worse, stop and think about what you’re doing. Fitness habits that hurt your health are neither good for you nor helpful.
Second, pay attention to your body and go with your gut. Diet and exercise are not exact sciences; even the most knowledgeable people don’t know everything. If you think that changing how you do something might be a good idea, you should follow your gut.
Lastly, know that you will learn much more from your own experiences than from any article. You should use this and other resources to get ideas. In addition, taking action is the best way to learn and understand. Plan and then take the first step. From there, you can go wherever you want, and I’m sure it will be a fun and rewarding journey for the rest of your life. Get fit and live your life.
HH88Bet… hmm, the name sounds interesting. I’ll need to do a bit of digging before I jump in. Hopefully, they have a good mobile experience. You can scout it here: hh88bet
Downloading the 939betdownload app was easy enough. The UI is slick. Might be your cup of tea. 939betdownload
Gave 98wn a look-see. Pretty solid experience. Worth checking out when you have a moment. 98wn
PGslotpeh888 on pgslotpeh888.com is pretty slick. The graphics are sharp, and the payouts seem decent enough. I give it a thumbs up for anyone looking for something new in the slot scene. Try it: pgslotpeh888.
Hey everyone, anyone had a go on Gameiwin recently? Seeing their name pop up a lot and I’m curious what the fuss is about. Looks like a good place to try your luck. gameiwin
G’day all, thinking of spinning some slots and Hi88nohu has caught my eye. Anyone played there before? Any insights on the experience? Hope it pays well. hi88nohu